Ribbet
Forum Replies Created
-
AuthorPosts
-
Hi Steve, Thanks for contacting us! You are correct that some effects do not behave as you might expect on transparent pictures. This is unfortunately a limitation of these effects.
Dragging on transparent pictures from the Photo Basket shouldn’t result in any blurring. Double-check the quality of the original transparent image, as it may be that it is slightly blurry. Sometimes there is a slight delay after dragging on your image before the image fully downloads and sharpens up.
Let us know if you have any further questions or concerns! If you would like further assistance one-on-one regarding your images you can contact us here: http://www.ribbet.com/contactus.rbt
Hi Buzzcar, Thanks for contacting us!
If I understand correctly, when creating your Shape Collage you will need to add as many photos from the Photo Basket as you have selected on the Number of Photos slider. This should allow you to have each photo used only once.
Let us know if you have any further questions!
Hi Buzzcarr, Thanks for contacting us!
In order to have your collage appear in the Library > History tab, you have to actually save the image to your computer (or to a social network). Clicking the Done button unfortunately isn’t enough; you have to then click the Save tab (up the top center) and complete the save.
Let us know if you have any further questions!
Hi Brian,
Thanks for contacting us! Unfortunately this is currently a limitation of the Ribbet text tool. There isn’t a way to size the paragraph and have the text automatically line-break. This is definitely something we’ll consider for a future version. At this stage you’ll have to manually line-break (and then re-line-break when you choose a new font).
Hi Jori,
Thanks for contacting us! You can try printing with your web browser. Browse to your image in the file system (Windows Explorer or Finder on Mac) and drag your file to your web browser. You can then follow these instructions to print at custom sizes for Windows or Mac.
Let us know if we can be of any further assistance!
Hi Zoe, Thanks for contacting us! Using the Crop tool is correct when trying to get your image to exactly fit different paper sizes. All that’s required is to choose the area you want to keep on your image (by dragging around the crop area which appears on your image when using this tool) and then click the Apply button. No other scaling is required, as the crop tool exactly sizes your image to fit the paper. Let us know if you have any further questions!
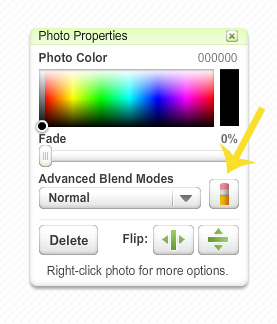
Hi Mel, Thanks for contacting us! Yes, this can be achieved by first creating a Blank Canvas (from the Library > Start tab) with the background color you desire (or transparent if required). Then drag on your image from the Photo Basket (at the bottom of the editor). Next click the Eraser button on the Photo Properties dialog which appears:

and erase the areas on your image you’d like to remove. You can also zoom in on your image (using the Zoom box at the bottom right) and adjust the eraser’s hardness using the slider below the eraser button.Let us know if you have any further questions. Thanks!
Hi Bey,
Thanks for contacting us! You can delete your photos from the Library > Get from Computer tab (click the Clear All button up the top right to delete them all). Rest assured that all previews on merchandise are only visible by you, and your Ribbet photos are always completely private.
Let us know if you have any further questions!
Hi Matilda,
Thanks for contacting us! The change you’re seeing on your computer compared to on Ribbet will be caused by differences in how different programs handle the color space of the image. This can be quite a technical and detailed area, but for further reading take a look at this article which outlines some of the ways you can manage this.
Let us know if you have any further questions!
Hi Lucy, Thanks for contacting us! For this problem, the best tool to use is the Pro tab > Pro Adjust tool. You can adjust the Exposure here (or try Auto-Exposure) and then paint the adjustment off the areas where you don’t want it to apply. This allows you to adjust the exposure of the dark areas, without further lightening the light areas. Let us know if you have any further questions!
Hi Sebe, Thanks for contacting us! Apps are under development and will be made available next year. We know how important it is to be able to edit on the go, and we’ll be delivering the ultimate editor for mobile. I’ll update you once the app is available. Let us know if you have any further questions!
-
AuthorPosts